今回のテーマ
ChatGPTのレスポンスを返すプログラムを作成する。
今回はJavaプログラミングでChatGPTから応答を返すプログラムを作っていきます。
今回の対象モデルは【text-davince-003】と【chatgpt3.5-turbo】です。
環境はEclipse2022を使用しています。
ChatGPTのアカウントは既に生成したことが前提です。

KindleUnlimited会員であれば、全ての本をご覧頂けます。 StreamAPIを理解すれば、Javaの世界が変わる 第1版
ChatGPTAPIキーの発行手順
まずは、ChatGPTのAPIキーを発行する必要があります。
step
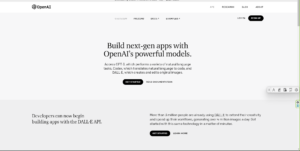
1https://openai.com/api/にアクセスします。
step
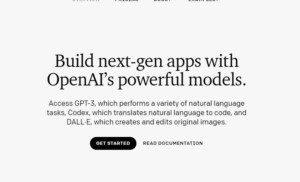
2「GET STARTED」をクリックします。
step
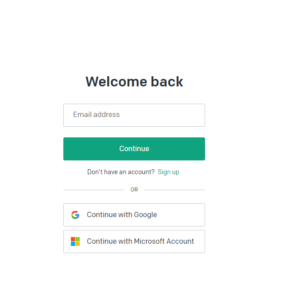
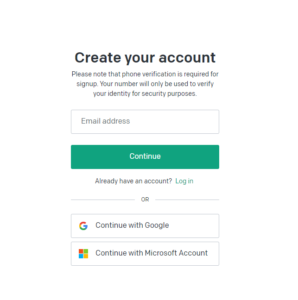
3アカウントは既に作成したと思うので、「Continue」をクリックします。
step
4メールアドレスとパスワードを入力し、Continueボタンを押下します。
step
5OpenAIの利用方法について質問に対し、個人利用として「I’m exploring personal use」を選択します。画像がなくてすみません。
以上でAPIキーを発行するまでのアカウント登録まで完了します。
step
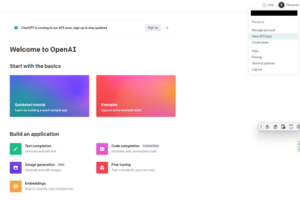
6メニュー画面の右上の「Personal」アイコンをクリックし、「View API Keys」をクリックします。
step
7「Create new secret key」を押下すると、APIキーを発行することができます。
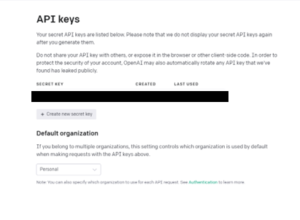
発行したAPIキーをコピーし、プログラム上で指定すると使うことができます。
APIキーの発行手順については以上です。

Jsonライブラリをインポート
続けて、ChatGPTとやり取りするためにJsonライブラリをeclipseにインポートします。
step
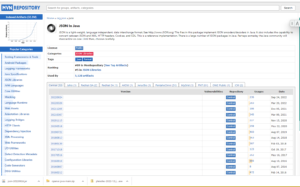
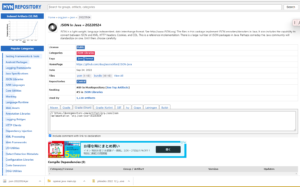
1下記のURLから最新版をクリックする。(今回の例では20220924をクリックしています。)
https://mvnrepository.com/artifact/org.json/json
step
2「bundle」をクリックすると、jarファイルがダウンロードされます。
step
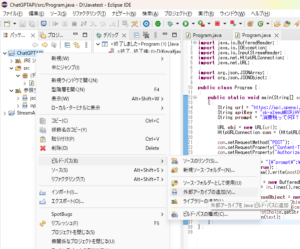
3Eclipseで、プロジェクトを右クリック⇒ビルド・パス⇒外部アーカイブの追加を選択
step
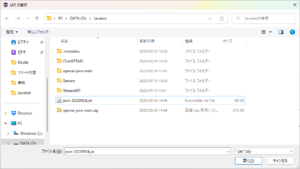
4ダウンロードしたjarファイルを選択し、開くをクリックすれば取り込めます。

ChatGPTを使ったJavaのソースコード
準備が整ったので、下記のソースコードをコピペして実行してみましょう!
APIKeyは発行したコードを入力してください!
|
1 2 3 4 5 6 7 8 9 10 11 12 13 14 15 16 17 18 19 20 21 22 23 24 25 26 27 28 29 30 31 32 33 34 35 36 37 38 |
import java.io.BufferedReader; import java.io.IOException; import java.io.InputStreamReader; import java.net.HttpURLConnection; import java.net.URL; import org.json.JSONArray; import org.json.JSONObject; public class Program { public static void main(String[] args) throws IOException { String url = "https://api.openai.com/v1/completions"; String apiKey = ""; //APIKeyを入力する。 String prompt = "消費税のブログタイトル考えてください。"; URL obj = new URL(url); HttpURLConnection con = (HttpURLConnection) obj.openConnection(); con.setRequestMethod("POST"); con.setRequestProperty("Content-Type", "application/json"); con.setRequestProperty("Authorization", "Bearer " + apiKey); String postData = "{\"prompt\":\"" + prompt + "\",\"model\":\"text-davinci-003\",\"max_tokens\":60,\"temperature\":0.7,\"echo\":false}"; con.setDoOutput(true); con.getOutputStream().write(postData.getBytes("UTF-8")); BufferedReader in = new BufferedReader(new InputStreamReader(con.getInputStream())); String response = in.lines().reduce((a ,b) -> a + b).get(); in.close(); JSONObject responseObject = new JSONObject(response); JSONArray choices = responseObject.getJSONArray("choices"); JSONObject firstChoice = choices.getJSONObject(0); String text = firstChoice.getString("text").replace("\n", ""); System.out.println(text); } } |
 出力結果
・「消費税アップ前に今こそ、消費税を把握しよう!」
Promptがリクエスト文となるので、好きな質問文にしてみてください!

ChatGPT-3.5Turbo対応版
ChatGPT-3.5Turboに対応したプログラムについてもみていきましょう!
ChatGPT-3.5Turboは会話履歴も一緒にリクエストを送ることができるので、String型ではなく、
Json型でリクエストします。
ソースコード例はこちらです。
|
1 2 3 4 5 6 7 8 9 10 11 12 13 14 15 16 17 18 19 20 21 22 23 24 25 26 27 28 29 30 31 32 33 34 35 36 37 38 39 40 41 42 43 44 45 46 47 48 49 50 51 52 53 54 55 56 57 58 59 60 61 62 63 64 65 66 67 68 69 70 71 72 73 74 75 |
import java.io.BufferedReader; import java.io.IOException; import java.io.InputStreamReader; import java.net.HttpURLConnection; import java.net.URL; import java.nio.charset.StandardCharsets; import java.util.ArrayList; import org.json.JSONArray; import org.json.JSONObject; public class Program { public static void main(String[] args) throws IOException, InterruptedException { //リクエスト用のJsonオブジェクトのリストを作成 var messages = new ArrayList<JSONObject>(); messages.add(new JSONObject().put("role", "system").put("content", "筋肉トレーニング")); messages.add(new JSONObject().put("role", "user").put("content", "ブログタイトルを考えてください")); getOpenAIResponse(messages); } private static String getOpenAIResponse(ArrayList<JSONObject> messages) throws IOException { String apiKey = ""; String model = "gpt-3.5-turbo"; try { System.out.println(messages); String response = generateText(apiKey, model, messages); System.out.println(response); return response; } catch (IOException e) { e.printStackTrace(); } return ""; } public static String generateText(String apiKey, String model, ArrayList<JSONObject> messages) throws IOException { String urlString = "https://api.openai.com/v1/chat/completions"; URL url = new URL(urlString); // HTTPリクエストの作成 HttpURLConnection connection = (HttpURLConnection) url.openConnection(); connection.setRequestMethod("POST"); connection.setRequestProperty("Authorization", "Bearer " + apiKey); connection.setRequestProperty("Content-Type", "application/json"); connection.setDoOutput(true); //JSONArrayでリクエストする。 JSONArray messagesJsonArray = new JSONArray(messages); JSONObject requestBody = new JSONObject() .put("model",model) .put("messages", messagesJsonArray); String jsonInputString = requestBody.toString(); connection.getOutputStream().write(jsonInputString.getBytes(StandardCharsets.UTF_8)); if (connection.getResponseCode() != HttpURLConnection.HTTP_OK) { throw new IOException("HTTP error code: " + connection.getResponseCode()); } //受け取ったレスポンスを整形する。 try (BufferedReader in = new BufferedReader(new InputStreamReader(connection.getInputStream()))) { String response = in.lines().reduce((a ,b) -> a + b).get(); in.close(); JSONObject responseObject = new JSONObject(response); JSONArray choices = responseObject.getJSONArray("choices"); JSONObject firstChoice = choices.getJSONObject(0); String message = firstChoice.getJSONObject("message").get("content").toString(); return message.replace("\n",""); } } } |
 出力結果
system筋肉トレーニングuserブログタイトルを考えてください。
「筋肉トレーニングで理想のボディを手に入れよう!」
下記のような形式を作って、リクエストします。
|
1 2 3 |
var messages = new ArrayList<JSONObject>(); messages.add(new JSONObject().put("role", "system").put("content", "筋肉トレーニング")); messages.add(new JSONObject().put("role", "user").put("content", "ブログタイトルを考えてください")); |
ここでいうsystemは過去のリクエストで、userは今回のリクエストです。
ロールは下記のような意味合いを持っています。
|
role |
内容 |
|
user |
現在のリクエスト |
|
system |
過去のリクエスト |
|
assistant |
過去のレスポンス |
そのため、上記のsystemの行をコメントアウトすると下記のような筋トレと関係ないレスポンスが返ってきます。
 出力結果
userブログタイトルを考えてください。
「日々のささやかな幸せを綴る日記」
このようにchatgpt3.5-turboから会話履歴に基づいたレスポンスを返すことが可能となりました。
ChatGPT3.5-turboの解説は以上です。

まとめ
今回はJavaでChatGPTを使用する方法を解説していきました。
細かいソースコードの説明はしておりませんが、StreamAPI、JSON、リストなどの使い方の説明と
なってしまうため、本記事では割愛させて頂きました。
上記のプログラムを使えば、ChatGPTと連携するプログラムはすぐに作れると思います!ぜひご活用ください!
最後まで読んで頂き、ありがとうございました!


